| data entry • chart comparison • styles • methods • text manipulation • asteroids | ||||||
Welcome to the first and most important Tutorial, Data Entry |
||||||
We will deal with saving files (and salvaging errors)
first, so that you can feel confident as you experiment with your new
software.
Saving DataPlease, >>click
here<<. to download an example chart that will provide you
with all data for this tutorial. The Entry of DataThe basic premise for using computers for any task is “garbage in, garbage out”. Astrology is no exception to this rule, therefore correct entry of data is vital to the calculation of the correct chart. Kairon 3 makes this easy. What Data is Required to Cast a Valid Chart?
How should this Data be entered?
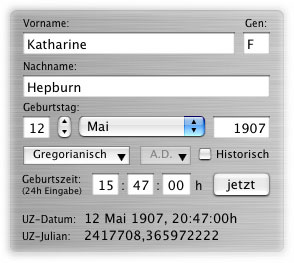
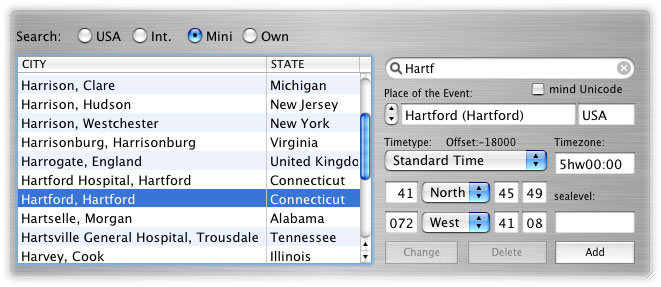
The entry field for "year" (following the month-popup) will assume a 4 digit parameter. Kairon will take your entries for what they are, and if you enter "03" it will be considered as the year 3 and not as the year 2003. The "Gregorian", and "A.D." menus and the "Historical" Check-box. are for use in historical research, and not often used in regular charts. The "Historical" Check-box will omit the year 0 for BC charts where historical data requires it. "Time of Birth" expects twenty four hour time. In twenty four hour time a day starts at 00:00:00 hours at midnight and last until 23:59:59 which leads to 00:00:00 hours of the next day. In this format, “12” in the hour slot means 12 PM, to enter the hour after midnight, you must enter “0”. Other “AM” hours are the same. You must add 12 to PM numbers (other than 12) to convert them to 24 hour time. The "now" Button will enter the current system time AND the system date. To find a Location in the "ACS-Atlas", select an atlas first. In Kairon's 30-launches demo (which can be launched 30 times with full functionality before entry of your personal license key is required to continue its use) the "USA" Atlas (>150.000 US locations) and the "Int." (>100.000 International locations) are greyed out and cannot be used. The Atlas "Own" starts out empty except for "Klagenfurt". As you type in the atlas search field, (rounded with a magnifying glass symbol in the left) the Mini atlas will find a close approximation to what you type. You MUST select your final location from the atlas list for it to be entered correctly. In some cases, many towns of the same name will be found. If so, use the stepper (below "Place of the Event") and refine your search by clicking on the upward or downward arrow. The upward arrow will move you forward in the alphabet, the downward steps backward. You can also make your selection from the atlas window using the scroll bars. Unlike the scrollbar the stepper can further extend your selection.
Extending the AtlasIf you wish to extend your "Own" Atlas, you MUST start in the “Mini” Atlas. Select a town of the same political region as the town you wish to enter. If you don't, the wrong daylight saving rule will be added to your new location. After selecting said city click the "Add" button. You will be prompted to adjust your chart list to reflect the changes you are about to make (and protect your existing data). Click the “Add” button again once you have made that adjustment to your chart list. You will be prompted to confirm the accuracy of your time-zone entry before you continue. If you know the longitude and latitude of your new entry, change the
close city's values for the new location's geographical co-ordinates,
but don't change the syntax. Use N for North, S for South, E for East,
W for West. The new entry must contain degrees, minutes, seconds, in
the same manner as the current entry. Enter the name of the new town in the field at the bottom of the window (province and country information will be added automatically)
If you don't have geographic co-ordinates for your new location, activate the Calculator check-box in the confirmation screen, you can calculate Longitude and Latitude from a geographical map. Enter the values for the co-ordinate lines on your map in the appropriate fields on the calculator. Measure the distance between the co-ordinate lines, and enter those values in the appropriate fields (inches or millimetres do not matter, just use the same ruler for all measurements). Now measure the distance from the top and right-hand co-ordinate lines to the town required. Enter those values in the appropriate fields. Sea level must be entered in meters to enable Kairon 3 to calculate precise topocentric charts. After confirming with "OK" you can view the newly entered town by selecting the "Own" atlas. The "mind Unicode" check-box is useful if you wish to enter data in unicode and search for them in unicode. It only applies to the "Own" atlas.
Managing AAF-Files DataFor those familiar with the AAF format... View > Text > AAF-File You may Copy-Paste any AAF-data from any AAF-Files into the AAF-Files section of Kairon 3. Don't forget to click the "update menus to changes" button to save the file. It can be difficult to quickly identify where one AAF record ends and
the next one begins. To make this easier, the chart selected in the Data
Entry window is automatically selected, start to finish, in the AAF-File
window. Tips and things to remember.You can set the default chart in the “defaults” screen of the “preferences” menu. (Kairon 3 > Preferences > Defaults). Which will have Kairon 3 open with the chart file of your choice on your next launch. (Setting this chart-file no longer gives you a “now” chart on launch, but that’s what the “now” button is for:)) This also sets the default for “New” when selected from the “File” menu. (File > New) or keyboard shortcut (command-N). Remember:
|
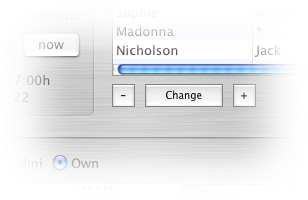 Select
the first chart in the “Promi.aaf” file (Katharine Hepburn).
Click the “+” button, and a new entry will be created at
the bottom of the list with the identical name and data. Click the “-“ button,
and the entry disappears.
Select
the first chart in the “Promi.aaf” file (Katharine Hepburn).
Click the “+” button, and a new entry will be created at
the bottom of the list with the identical name and data. Click the “-“ button,
and the entry disappears.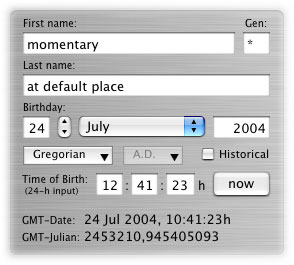
 |
|||
 |
|||