| data entry • chart comparison • styles • methods • text manipulation • asteroids | ||
Welcome to this tutorial on the not so obvious preferences, The Preferences Styles |
||
What Topics will this Tutorial explain?
How the Preferences Mechanism Works
Kairon 3 allows only one open preference file at a time, so a preference will always apply to all open files. This should allow more focus on the actual topics of a chart rather than allowing too much emotional distraction by colors that may have been valid in some respect, but would only be disturbing in another. So, while prior versions of Kairon had been using colors more chart specific, now these colors are more topic specific or more day specific. How to Edit the Name, Color and Glyph of an ObjectAn object (planet,
arabic point, asteroid, hypothetical planet) can now have any
color, any custom name and any glyph of any font you may wish. There
is no restriction on this and, once set up, any preference file can
be used with any chart. All this and even more is set up after selecting
the "Styles" tab of the preferences dialog: Before you do anything else, best set up your preferred colors by adding them into the grid as shown above: Click on the button below the label "Color" to show the displayed colors wheel, then play around until you have a color to your liking and drag it from the field on top down into the grid at the bottom. The grid is expanded simply by dragging the tiny dot i marke out by a red circle. Once done set over to step 2 and first click on the "List all Symbols" button, make sure the now showing up letters are all selected and click the "Change Font" button and choose a font to your liking. Kairon 3's default font is "Kairon Semiserif" which was installed automatically with Kairon 3. Any font used by Kairon will be needed by it to display its graphics and therefore should never be deactivated in the finder. Use the vertical slider or the little input field above it to resize your just inserted glyphs until you can easily see all their details. That size will not be of any other avail than to let you better see what you are doing. This all done you can now conveniently
step through the entire preference and can do quick changes here and
there. To step, use the radio buttons on top along with the stepper near
the object name entry field (here displaying the
word "Mars"). Any change you wish Kairon 3 to remember must be followed by a hit on the "Apply Changes" button. Otherwise the next click on the stepper will reset your object to what it has been before. This way you can better experiment with the size and color without needing to fear you might accidentally overwrite a precious setting. Every hit on the "Apply Changes" button already saves your changes right into the active preferences file. How to Exclude an Object from some or all Aspect CalculationIn short, this is all accomplished by one single number, the "Orbis %". This value is taken into consideration the moment Kairon 3 attempts to calculate an aspect. It defines, how much of the actual orbis to which an aspect is set is used. The default setting for all objects is 100, which means that the orbis is to 100% allowed. So, if in the aspect section of the preferences dialog you allow an orbis of 8° to your trines and if the trines are activated by the checkbox to their left, and if the "Orbis %" of all objects is set to 100, then all trines will ever be recognized and drawn as trines +-8°. If you would now set the "Orbis %" of e.g. the ascendant to zero, and the "Orbis %" of e.g. the sun to 100, then their shared "Orbis %" value would be 50(shared value = (value1+value2)/2) and they would only indicate a trine with said orb of 8° if the actual orbis was less than 4°, because 50% of 8° used make 4°. This way you can set up a planet so that it only is taken into account if it has very exact aspects, while another object may be more important to you and you allow it to be taken into consideration with also weaker aspects. So, the lesser the value of the "Orbis %" of an object is, the more exact an aspect must be so that it is shown with this object. If you wish to exclude an object from all aspects, but still have it drawn into the chart, set its "Orbis %" to -100 (this will exclude it from all aspects with objects whose "Orbis %" not more than 100 and you should not set any "Orbis %" to more than 100, even though its would technically be possible, because it would mess up with your general orbis limit and some aspects might even overlap each other so that you would never know if an aspect actually is the aspect it claims to be or another with too much tolerance). How to Customize the Calculation of Element Values
You may already be familiar with the number shown here: every planet is asigned points according to its asumed relative importance. So, if a panet is in a fire sign, depending on its number of points it will add this value to the fire depot. But, to me it seems not very reasonable, if a person has moon in aries, to consider it as even more fiery than if it had mars in aries, for moon acconts for 4 points and mars only for three. A water sign like the moon can never contribute to fire, it can only loose its watery quality. So Kairon 3 allows asigning elements to any object, as also it allows not to. In case of the moon the default is set to water, and in case of the mars the default is set to fire. These two are easy. Planets that are not that clear i have left out from defaulting them. If left out, all is at it has ever been. (The standard setting asigns 5 points to the major lights sun and moon, 4 points to ascendant and mc, 3 for the personal planets mercury, venus and mars, two for mars and saturn and one for the transpersonal planets along with some asteroids, where they are selected: an object that is not selected, i.e. not drawn into the chart, is not considered for element calculation). But how is this new method now taken into account? as there are four elements, there are four kinds of wellness an object may get into:
the additional points will simply be added to the already won points.
|
 Kairon
3 no longer uses a separate preference in every chart file, but carries
an unlimited number of preference files in the folder "kPref" int the
"Kairon" folder
Kairon
3 no longer uses a separate preference in every chart file, but carries
an unlimited number of preference files in the folder "kPref" int the
"Kairon" folder 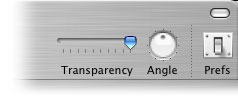 You
can open the "Preferences" dialog by selecting "Preferences…" from the
"Kairon 3" menu or by simply clicking the "Prefs" Icon of your toolbar
You
can open the "Preferences" dialog by selecting "Preferences…" from the
"Kairon 3" menu or by simply clicking the "Prefs" Icon of your toolbar 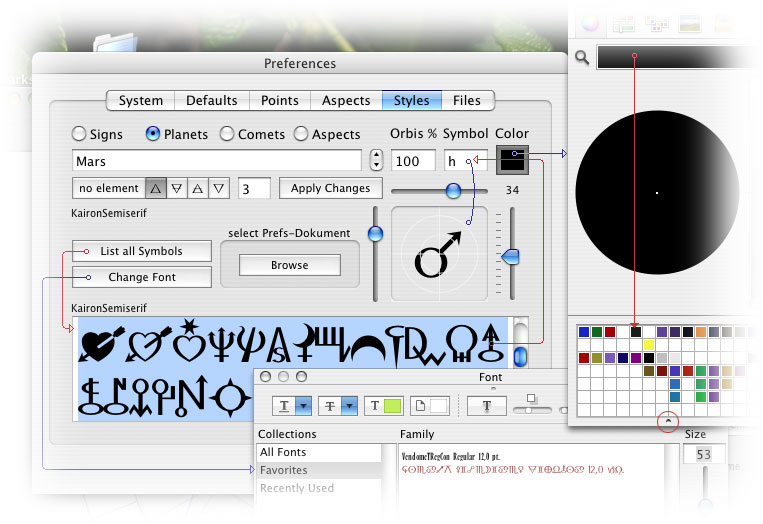
 |
|||
 |
|||